An Introduction To Electric Guitar:
Where To Start With Scales
The transition from strumming chords on an acoustic guitar to rocking out on an electric is actually a very simple one, yet it is made to seem more daunting then it really is from the overwhelming amount of musical information found online regarding what new electric guitar players should be practicing.
I hear things like this all the time from new students; “there is so much information out there, and most of it contradicts itself, all I want to know is what am I supposed to practice right now to improve at the style of playing I like?”
If your a new, or improving electric guitar player and you can relate to the above statement then these series of FREE blog lessons are for you!
In this FREE blog lesson we will be taking a look at where new electric guitar players should be starting with scales.
The world of scales is vast and in a lot of ways overwhelming, do you need to know all of the scales out there? And if so, which ones do you start with?
I don’t know if anyone knows exactly how many scales are in existence, but there are a lot. And no, in order to play contemporary and electric guitar styles you don’t need to know all of them.
The most commonly used scales in electric guitar styles are;
Pentatonic & Blues: Major and Minor versions.
Major.
Minor: Including harmonic minor and melodic minor.
Dorian.
Phrygian: Including Phrygian dominant.
Lydian.
Mixolydian.
Locrian.
You don’t need to memorise and understand uncommon and unorthodox scales for contemporary electric guitar styles unless of course you want to, the above scales and modes make up the majority of what you will need.
That being said, where should you start?
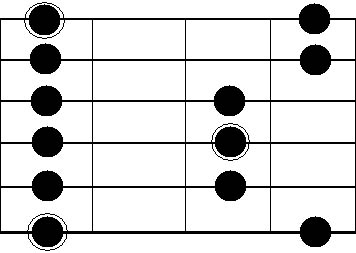
I think the ultimate starting point for somebody learning scales is the pentatonic. The 1st position of the minor Pentatonic in the key of A is where we will start today.
We are going to start by looking out how you should position your hand and fingers in order to play this particular scale and the picking you should use.
Hand Position
Position your thumb in the back of the neck inline with the second finger of your fretting hand with a good healthy curve to your knuckle and distal joint (the curve above your finger nail), this allows your finger tips to effectively access the strings resulting in far more accurate playing.
If you have never attempted to play this way then you may find this hand position to be uncomfortable at first, but if you persist it will become more and more natural.
Picking
Hold your pick for optimum picking potential is on an angle to the strings, with the point of the pick pointing into the strings.
I also recommend holding the pick between the outside of your fore finger and the print of your thumb with about a Cm or so of the pick point protruding for string contact.
Holding your pick on an angle to the strings will allow the pick to glide through the string with every down and up stroke, if the pick is not angled to the string, and it falls flat against the string when picking, this can cause snagging.
Having the point of the pick pointing in to the strings will allow even contact with all strings on down strokes and upstrokes. If the pick point is on a funny angle to the strings it can cause snagging.
Holding your pick between the print of your thumb and the outside of your fore finger with about a Cm or so of the pick point protruding for string contact will allow the most control over your picking.
Ascending

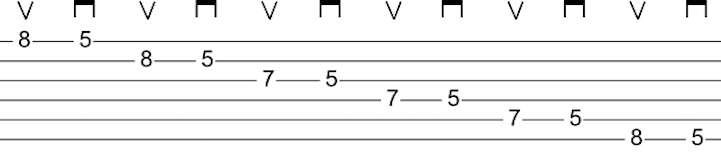
We are going to start by playing the 1st position of the Am pentatonic scale in an ascending manner with the 1st finger of your fretting hand on the low E string at the 5th fret picking this note with a down stroke. Next we will play the low E at the 8th fret with your 4th finger with an up stroke.
Then we’ll play the A string at the 5th fret with your 1st finger with a down stroke. Then the A string at the 7th fret with your 3rd finger with an up stroke.
Then the D string at the 5th fret with your 1st finger with a down stroke. Then the D string at the 7th fret with your 3rd finger with an up stroke.
Then the G string at the 5th fret with your 1st finger with a down stroke. Then the G string at the 7th fret with your 3rd finger with an up stroke.
Then the B string at the 5th fret with your 1st finger with a down stroke. Then the B string at the 7th fret with your 3rd finger with an up stroke.
Then the high e string at the 5th fret with your 1st finger with a down stroke. Then the high e string at the 8th fret with your 4th finger with an up stroke.
Practice descending slowly focusing on keeping your hand position and fingering correct as well as your picking. Accuracy and correct technique are more important then speed at the moment.
Descending
Now we are going to play the 1st position of Am pentatonic in a descending manner. We will start by playing the high e string at the 8th fret with your 4th finger with an up stroke. Then the high e string at the 5th fret with your 1st finger with a down stroke.
Then the B string at the 7th fret with your 3rd finger with an up stroke. Then the B string at the 5th fret with your 1st finger with a down stroke.
Then the G string at the 7th fret with your 3rd finger with an up stroke. Then the G string at the 5th fret with your 1st finger with a down stroke.
Then the D string at the 7th fret with your 3rd finger with an up stroke. Then the D string at the 5th fret with your 1st finger with a down stroke.
Then the A string at the 7th fret with your 3rd finger with an up stroke. Then we’ll play the A string at the 5th fret with your 1st finger with a down stroke.
Next we will play the low E at the 8th fret with your 4th finger with an up stroke. Then low E string at the 5th fret with your 1st finger picking this note with a down stroke.
Practice descending slowly focusing on keeping your hand position and fingering correct as well as your picking. Accuracy and correct technique are more important then speed at the moment.
Ascending and Descending

Once you become comfortable both ascending and descending, try starting the scale in an ascending manner then turning around on the high e to play it in a descending manner.
Next we will be taking a look at how to apply soloing techniques to this particular scale.
If you are interested in guitar lessons then fill out the form for your FREE evaluation lesson by clicking the FREE lesson button below.
CALL NOW
To book your FREE evaluation lesson
0490 137 621
![]()