An Introduction To Electric Guitar:
Where To Start With Picking
The transition from strumming chords on an acoustic guitar to rocking out on an electric is actually a very simple one, yet it is made to seem more daunting then it is from the overwhelming amount of musical information found online regarding what new electric guitar players should be practicing.
I hear things like this all the time from new students; “there is so much information out there, and most of it contradicts itself, all I want to know is what am I supposed to practice to improve at the style of playing I like?”
If your a new, or improving electric guitar player and you can relate to the above statement then these series of FREE blog lessons are for you!
In this FREE blog lesson we will be taking a look at where new electric guitar players should be starting with picking.
Established picking is the life blood of electric guitar playing, it doesn’t matter whether you want to play fast or slow, developing your picking and understanding correct picking technique is one of the most important things any electric guitar player can achieve.
In this lesson we will look at where to start on your journey to developing your picking, how to pick correctly and how to practice picking effectively.
Holding The Pick Correctly
Holding the pick correctly is crucial for effective picking, how you hold the pick can have a huge bearing on the ability you are able to acquire.
Holding the pick in an inefficient manner can cause picking problems that guitar players aren’t even aware of. The biggest one of these is snagging, this is when the pick is held at an inefficient angle to pick through the strings smoothly and as a result snags against the strings.
Another is when players hold the pick so the point of the pick does not point directly into the strings, instead its on a funny angle, this can also cause snagging.
The best way to hold your pick is on an angle to the strings, with the point of the pick pointing into the strings. I also recommend holding the pick between the outside of your fore finger and the print of your thumb with about a Cm or so of the pick point protruding for string contact.
Holding your pick on an angle to the strings will allow the pick to glide through the string with every down and up stroke, if the pick is not angled to the string, and it falls flat against the string when picking, this can cause snagging.
Having the point of the pick pointing in to the strings will allow even contact with all strings on down strokes and upstrokes. If the pick point is on a funny angle to the strings it can cause snagging.
Holding your pick between the print of your thumb and the outside of your fore finger with about a Cm or so of the pick point protruding for string contact will allow the most control over your picking.
Hold The Neck Correctly
Now that we know how to hold the pick, we are going to look at what to do with the fretting hand when picking.
How you hold and fret the strings when picking is very important, your fretting hand is where great technique comes from so its important to understand the fundamentals that comprise great fretting technique.
The thumb must be in the back of the neck inline with the second finger and the fingers must be curved at both the knuckle and the distal joint (the bend above your finger nail) allowing your finger tips to fully to access the strings.
Keeping Your Fingers Close To The Fretboard
Keeping your fingers close to the fret board is a largely overlooked technique that is critical for effective fretting. This simple yet crucial technique will allow you to play faster and more accurately with better control and more ease.
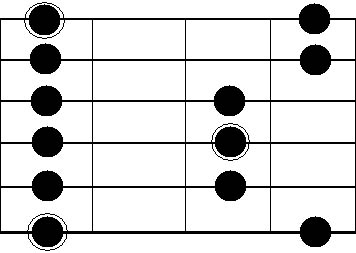
Now that you understand how to correctly hold and use the pick as well as how to correctly hold the neck and fret the strings, let’s look at how to apply picking in a couple of different exercises using the 1st position of the Am pentatonic that we learnt in the previous lesson on scales.
Picking Exercisers
First of all we are going to practice picking the the scale in an ascending and descending manner (just like we did in the previous lesson on scales).
The next exercise is a common blues / rock picking lick, we are going to play the ascending version first.

We are going to start by picking the 8th fret on the low E played with your 4th finger with a down stroke. Next play the 5th fret with your 1st finger on the low E with an up stroke.
Then pick the 8th fret on the low E played with your 4th finger with a down stroke. Next play the 5th fret with your 1st finger on the A string with a down stroke.
Next play the 8th fret with your 4th finger on the low E string with an up stroke. Next play the 5th fret with your 1st finger on the A string with a down stroke.
Next play the 7th fret with your 3rd finger on the A string with an up stroke. Next play the 5th fret with your 1st finger on the A string with a down stroke.
Next play the 7th fret with your 3rd finger on the A string with an up stroke. Next play the 5th fret with your 1st finger on the D string with a down stroke.
Next play the 7th fret with your 3rd finger on the A string with an up stroke. Next play the 5th fret with your 1st finger on the D string with a down stroke.
Next play the 7th fret with your 3rd finger on the D string with an up stroke. Next play the 5th fret with your 1st finger on the D string with a down stroke.
Next play the 7th fret with your 3rd finger on the D string with an up stroke. Next play the 5th fret with your 1st finger on the G string with a down stroke.
Next play the 7th fret with your 3rd finger on the D string with an up stroke. Next play the 5th fret with your 1st finger on the G string with a down stroke.
Next play the 7th fret with your 3rd finger on the G string with an up stroke. Next play the 5th fret with your 1st finger on the G string with an down stroke.
Next play the 7th fret with your 3rd finger on the G string with an up stroke. Next play the 5th fret with your 1st finger on the B string with a down stroke.
Next play the 7th fret with your 3rd finger on the G string with an up stroke. Next play the 5th fret with your 1st finger on the B string with a down stroke.
Next play the 8th fret with your 4th finger on the B string with an up stroke. Next play the 5th fret with your 1st finger on the B string with a down stroke.
Next play the 8th fret with your 4th finger on the B string with an up stroke. Next play the 5th fret with your 1st finger on the high e string with a down stroke.
Next play the 8th fret with your 4th finger on the B string with an up stroke. Next play the 5th fret with your 1st finger on the high e string with a down stroke. Then finish by playing the 8th fret on the high e string with your 4th finger with an upstroke.
Next we will be taking a look at how to use correct legato when soloing.
If you are interested in guitar lessons then fill out the form for your FREE evaluation lesson by clicking the FREE lesson button below.
CALL NOW
To book your FREE evaluation lesson
0490 137 621
![]()