An Introduction To Electric Guitar:
Where To Start With Bending
The transition from strumming chords on an acoustic guitar to rocking out on an electric is actually a very simple one, yet it is made to seem more daunting then it is from the overwhelming amount of musical information found online regarding what new electric guitar players should be practicing.
I hear things like this all the time from new students; “there is so much information out there, and most of it contradicts itself, all I want to know is what am I supposed to practice to improve at the style of playing I like?”
If your a new, or improving electric guitar player and you can relate to the above statement then these series of FREE blog lessons are for you!
In this FREE blog lesson we will be taking a look at where new electric guitar players should be starting with bending.
Bending is one of the electric guitars most expressive techniques and is an integral skill to develop for the aspiring lead guitarist.
Developing bending ability takes time, muscles in the fingers and hand that are necessary to bending strings must be developed and this can’t be done overnight, effective and consistent practice is the key.
That being said, the understanding of how to bend properly and how to effectively practice bending CAN be developed overnight. So without further a due let’s start by looking at what it takes to execute great bends and how to practice bending effectively.
Holding The Neck For Bending
One of the most important things for bending strings is holding the neck properly. The most effective way of holding the neck for bending is with your thumb wrapped over the top of the neck and the curve of the neck filling up the curve between your thumb and your 1st finger. By doing this you can use your thumb like a winch to help pull your bends up.
Using Additional Fingers To Support Bends
When bending from your 2nd, 3rd or 4th finger, it’s important to use the other fingers behind the finger you are using to bend to assist the bend also.
Place the remaining fingers in the frets behind the finger you are bending from and press down, bend with all the fingers, not just the one that is leading the bend. You will still feel that the finger you lead the bend with will receive most of the pressure but having the other fingers behind it add an astonishing amount of strength and control to a bend.
Again, this may seem like common sense but believe me, its not. The amount of guitarists out there that look like they use additional fingers to support bends but still use only one because they don’t add enough pressure to the other fingers is incredibly high. Poor support in bends can actually make it harder to bend in tune, as well as apply controlled vibrato.
Bending In Tune
Bending in tune is the most important thing about bending.
Whether it’s a full tone bend, a ½ tone bend, a 1 and a ½ tone bend, a 2 tone bend or a quarter bend, the key to bending in tune is to understand what note you are bending to, and how its supposed to feel and sound when you reach it.
Every bend will feel a certain way when executed correctly, there will be a certain place on the fretboard your fingers must reach, you will feel a certain amount of tightness in the string when you bend it to the correct point. After time all of these elements will be programmed into your muscle memory allowing you to bend in tune automatically.
To practice bending in tune choose a note on the guitar neck to bend, then reach up to the note that you are planning on bending to and play it, this is how your bend will sound when you bend it in tune.
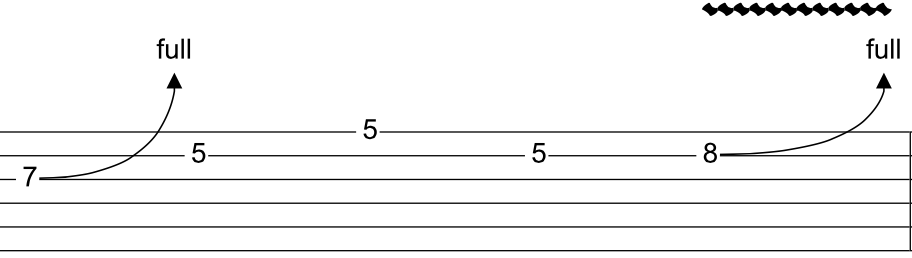
We are going to practice this by bending the G string at the 7th fret with our 3rd finger. Fret the G string at the 7th fret with the tip of your 3rd finger applying a healthy curve to the knuckle and distal joint (the bend above your finger nail), now place your 2nd finger in the 6th fret on the G string and your 1st finger in the 5th fret on the G string, don’t forget to fret the string with your finger tips and curve both your knuckle and distal joints.
We will bend the G string a whole tone, the note you will hear when the bend is in tune is the E note at the 9th fret on the G string. Before you bend the G string, reach up and play the E note at the 9th fret on the G and keep this sound in your ears because this is exactly how you wan’t your bend to sound.
Now bend the G a whole tone. To effectively bend the G string make sure your thumb is around the top of the fretboard (refer to the image above) and your fretting with your finger and curving your knuckles and distal joints.
Bend with ALL your finger, this includes the supporting fingers behind the finger leading the bend. As you bend to the E note you played before, pay attention to the amount of pressure you feel in your fingers, this is the amount of pressure you should feel every time, make a mental note of this feeling, this will help your muscles memorise what it feels like to bend in tune which will develop the ability to bend in tune all the time without having to think about it.
Now we will try bending the B string at the 8th fret a whole tone with our 4th finger. In order to bend effectively with your 4th finger place your supporting fingers in the frets behind the fret your 4th finger is in. Place your 3rd finger on the B in the 7th fret, your 2nd on the 6th fret on the B and your 1st finger in the 5ht fret on the B, and like always curve the knuckles and distal joints of all fingers.
The note you will be bending to on the B string is an A note, this A note is at the 10th fret on the B. Before you bend to this note reach up and play it, keep the note in your ears because this is exactly what your bend should sound like.
When you bend, bend with all fingers (this includes the supporting fingers behind the 4th finger) and pay attention to the pressure you feel in your fingers, make a mental note of this pressure because this will help your muscles memorise what it feels like to bend to this note.
Now we are going to take a look at a popular blues / rock lick that incorporates both these bends.
The lick is going to start with a bend on the G string at the 7th fret with the third finger just like before, then bar the B and the high e string at the 5th fret with your 1st finger and pick the B string, then the high e string then the B again. Then finish by bending the B string at the 8th fret with your 4th finger just like before.
Next we will be taking a look at how to use correct picking when soloing.
If you are interested in guitar lessons then fill out the form for your FREE evaluation lesson by clicking the FREE lesson button below.
CALL NOW
To book your FREE evaluation lesson
0490 137 621
![]()